Showing posts with label DIY. Show all posts

Friday, September 29, 2017

Dolman Shirts Head to Head part 1


I've been loosing inches, and dropping sizes while eating on THM. As a result almost none of the clothing I sewed up last year is going to fit me properly this fall/winter.
While going through my patterns to decide what to make I realized I own 8 different dolman style top patterns. EIGHT. That's quite a few.

I'd really only sewn up 2, and thought in light of my clothing needs it would be a good opportunity to sew up a shirt form each pattern and compare patterns, fit, and such for the internet.

I'm going to be sewing up 7 of those patterns, some of which are free by joining facebook groups in order to get codes for thier shops. And I'm going to break this into two posts.

SOme of these were turned from long into shortsleeves by myself. I will denote this in the description. None of these patterns were given to me for this post. This is purely my opinions and based on my experiences.

I tried to use fabrics that had similar drape and thickness in hand. This was mostly successful. though a few will need to be remade in other fabrics to see if I REALLY like the fit as they turned out a bit differently than I thought they would due to fabric choices.

I took the most unflattering angles so you can see exactly how each top fits, A straight from the front, side view, arms straight out(to compare the "wings", and then a nicer photo.

So without further ado Dolman Shirts HEAD to HEAD pt 1.


First up is the HALA SLIM DOLMAN 


  • This pattern has layers and no trim pages. Which makes assembly pretty fast.
  • Measurements for cuffs and band are on the pattern. 
  • I used a sweater knit from my stash that I've had so long I have no idea the fabric content. But I think it's a cotton spandex blend.
  • I made this in a size 6 which was not graded. It's a bit snug in the belly. If I wanted a FABULOUS fit, I'd really need to do a full tummy adjustement or size up in the tummy and hips. I have a long torso, but my waist is really high. Just for refrence. This might have changed fit some if the fabric had a touch more drape or stretch.
  • The directions were clear and simple lots of tips for altering the pattern to have deeper "wings" or more slim ones, alter the neckline, etc. directions are photos and text based. 
  • I used my own neck band calculations for the neckline as I don't find that following the Suggested measurements results well for me.
  • I made the long sleeved version and cut to the longest length then added cuffs. as I typically do with any pattern as I get cold otherwise.


GRAINLINE HEMLOCK

  • This is a OS pattern so it is very loose and straight. It fits up to a 43.5 inch bust and 45 inch hip. as such there are no layers. This pattern will need trimmed to assemble. 
  •  I used a very drapey sweater knit for this one. It's practically see through and heavier than I thought. I want to make this one up in another fabric and see how I feel about it then.
  • Directions are line drawings and simple like any dolman construction. It's a bit trickier to add the sleeves and sew the side since I used a serger and due to the angles on the body and sleeve.
  • I used my own neckband calculations on this one as sweater knit drapes and stretches so much more differently than other fabrics with lots of spandex in them. 
  • This pattern has both a  long and short sleeved option. I used the long sleeved but did not add a cuff. I may go back and add one later as the sleeves are a bit shorter than I like. 


George and Ginger I Heart U

  • This is another free pattern in the george and Ginger facebook group. It's intended to be a pajama set and comes with a shorties pattern as well. It has no layers, And no trim pages, but is very well marked so that I had no trouble marking and tracing my size with ease. Even though I use a black and white printer. 
  • I used a rib knit from joanns for this one. It's drapey and comfy and will be perfect when fall weather finally hits. 
  • directions are clear line drawings and there are photos of finished garments as well. It's another with simple construction so I honestly just glanced over them. Once you've sewn a few dolmans you don't usually need directions for them. 
  • I used my own neckband calculations. and cut it the opposite direction of the stretch for an interesting detail. 
This pattern only comes in short sleeves. I drafted a new sleeve using the long sleeve part of the sweet tee from patterns for pirates, grading from the wrist to the width I needed to match the width of the sleeve opening.


Patterns for Pirates Sweet Tee

  • This pattern is NOT free. I made a size M with Large sleeves as her patterns tend to be snug fitting in the sleeves and I don't care for that. It's got layers, and no trim pages. 
  • I used a cotton lycra for the front of this top as well as the sleeves and cuffs/neckband. and a Jersey for the back. I had this one all ready cut out in this fabric and sitting waiting to be sewn up so I didn't move to another material. 
  • directions are step by step photos and text. So very easy to follow even for a beginner. I made almost only this pattern last summer and basically lived in it so I was all ready very familiar with the process though. 
  • I used my own neckband calculations. 
  • I sewed up the long sleeves version, cut to the longest length and then added cuffs again. 


Patterns for Pirates Pumpkin Spice Dolman

  • This pattern is NOT free. I made a size small, with Medium sleeves. I could have sized up a bit but this pattern tends to run large so I made a smaller size. In hindsight due to my material I wish I had sized up.  This has layers and No trim pages. 
  • I used an unknown fiber content sweater knit I got in a remnant bin from a warehouse sale for this one. I THINK it's a poly blend baby terry. but not sure. It's very hot for being so thin. 
  • Directions are step by step photos and text. Super easy for beginners to follow. 
  • I used my own neckband calculations. 
  • I sewed the long sleeved version of this pattern. Cut to longest length with cuffs added to that. 


In conclusion.....

I think my favorite after seeing photos is the sweet tee. With the grainline hemlock coming in second. I hope to sew up another of both of these and compare to my favorite of the next batch. The plan will be to sew all of those in the same fabric content to get the best comparison.

If you have any questions please leave them in the comments and I will answer as well as update the post with the information! 

Monday, October 27, 2014

Snap Laundry Tabs

Sometimes necessity is literally the mother of invention.
In this case I've been madly sewing newborn diapers and as such I have been using lots of hook and loop tape. (Also known as Velcro) but the downside is that the loop piece is always shorter than I need and I run out two or three diapers in just before I get to the laundry tabs.

I also have an abundance of snaps since even with a snap down rise my newborn diapers just don't use nearly as many snaps as a batch of OS diapers.

So behold the snap laundry tab.

Basically sew your Velcro wing tabs as usual. Then fold over as if you were closing them to Velcro laundry tabs.

Using your awl force it through both parts of the wing. Do this just above and below the center of the Velcro piece.

Next attach your snaps. I recommend putting the larger male snap half on the area next to the Velcro, and the female shorter piece on the section further in the diaper. This way the smoother part is against your baby's skin.

Wha la snap laundry tabs!

Friday, October 10, 2014

Top Stitching a Diaper and Sewing Elastics

In the cloth diaper sewing group I'm in on facebook, we were asked how we all do our elastics. I seem to be in the minority who sews elastics in when they do top stitching. She asked if I could take pictures and I decided to make a little tutorial on how I did it.
It would be easier to show you in a video but we seem to have lost the charger to the digital camera I use for that. And since I don't have a way to mount my cell phone to my head hopefully this will do.

First note my diaper is turned right side out and waiting on elastics. This is a pocket so will have back elastic and leg elastic on both sides.

 
mark your elastics per your pattern. I use a washable crayon. 

 
Pin your back elastic on the marks. I leave about 1/4 inch extra beyond the pins.  This is it without any other pins all bunched up.

 
Stretched out.  Now with the diaper stretched use your fingers to move the elastic up against your seam allowance. And place a pin directly underneath. repeat across till the pin hold the elastic in place. Check to make sure you aren't pinning the elastic by accident.

 
I lifted the pocket opening to try to show you how this looks inside. It's hard to see but the elastic is not pinned to the diaper but is held in place by the pins if that makes sense. 

 
All pinned in place.

 
Repeat the pinning at the elastic caking marks for the leg. 

 
I use my knees and hold one wing with them, then use one hand to stretch the diaper out and the other to place my pins. you're doing the same thing where you push the elastic into the seam allowance, and pin just below it. 

 
Here's the leg all pinned and ready to sew. 

 
You can sort of see that the pins are not right against the edge. You'll be sewing in the area of fabric on your pins. 

 
One leg done. 

 
Repeat on other side and you are ready to sew. 


Ok so I start at the back elastic tacking mark and sew down, reverse, then back down tacking it in place. 

 
Pivot and sew across the pinned area. I'm bad and sew over my pins, but you can definitely remove them as you sew just make sure to pull your fabric taught so the elastic stays where it is pinned and to sew slowly.
Sew across the area of fabric my finger is pointing to.


Showing the stitching so you can see where I'm talking about sewing. 

 
Go back up the next tack mark, forward, then back again, turn and pivot the diaper and carry on top stitching ...

 
around the wings and to your leg elastic.  

 
Turn your diaper again and tack your elastic down. I sew in reverse once then back forward. 

 
Pivot back and sew along your pin area again. 


I was trying to get a good photo of my needle plate so you could see where I'm sewing. I think that's the 6/8th mark. 

 
Diaper slightly stretched so you can see the finished leg. I forgot to take a photo of the other end of the leg elastic. But it's the same process. So you just pivot and tack the elastic down then continue top stitching around the front of the diaper. 

 
Other side has been reached. So I tack the elastic down, reverse, and forward, then follow the same process of sewing on the pinned area. around the 6/8th mark.

 
Reached the last elastic marking. tack down, reverse,

 
and go forward, then continue top stitching... 

 
Till you reach your starting point with the elastic tack mark on the back of the diaper.  Finish your threads how you like and clip them, now all that's left is your snaps or velcro on the wings and you are set.


Hope that makes sense!

Thursday, October 31, 2013

Babywearing for the Plus sized mama's

What started it all:

I was asked recently what I'd recommend for a plus sized mama who wants to baby-wear.
First thing I'd recommend is to buy a tape measure and measure your waist. Knowing this measurement will help you when buying a carrier. In many cases a carrier has straps and you need to know if they are going to fit your waist.
Measure just above your hips and at your natural waist(usually around your bellybutton). If the measurements for the carrier's waist ties/belt will wrap around the largest measurement with room to tie a knot(I'd guess add extra 2 feet) then you are probably safe.

DIY Products:

For the crafty mama's I'd first recommend making a carrier. A Mei tie or a stretchy wrap will be fairly simple.
Stretchy's are recommended to start at 5 yards but If you go with 6-7 you will probably be safe. I'm a size L(when newly breastfeeding) 36D cup and a 5 yard wrap is PLENTY long enough for me. I'd guess it would fit an XL mama as well and you could add another yard per size and it won't hurt anything. Once you've wrapped a squish up in the wrap you will be able to tell if it's too long. And if it is, simply trim the "tails" shorter.


Here's some great tutorials on making a stretchy wrap:
http://aaronandmelissaanderson.blogspot.com/2012/10/diy-moby-wrap.html
http://www.elleapparelblog.com/2012/02/moby-wrap-tutorial.html
The stretchy in this requires some sewing but would be super cute and even cheaper to make:
http://lulastic.co.uk/parenting/babywearing/babywearing-three-easy-and-quick-diy-sling-tutorials/
And in case I forgot to mention it this is typically a NO SEW project!
There is a downside to stretchy wraps though, they really start to get uncomfortable for mom and baby at about 15lbs and you CAN NOT wear them to do a back carry as it is NOT safe.
Here are some of my favorite Stetchy wrap Videos: (You can also look for directions for using the "moby", or "sleepy" wrap but beware any that say it's ok to do a back carry.)
http://www.youtube.com/watch?v=J19oOkQ61hI&list
https://www.youtube.com/watch?v=fhBmqw7npYU


Next would be a mei tie. This one is VERY easy to make if you can do a simple straight stitch on your sewing machine. I recommend this pattern:
McCall's M5678
Ignore the pouch sling as it's unsafe. The striped version is the one you want. Simply make the straps LONGER and you'll be set.
You can use this for a newborn, and infant and even small toddlers.
For free patterns:
http://www.grumblesandgrunts.com/2010/10/how-to-sew-mei-tai-baby-carrier.html
http://www.afullerday.com/2008/01/diy-hood-to-headrest-mei-tai-tutorial.html


And wearing directions:
https://www.youtube.com/watch?v=f61gevDtAwQ
http://www.youtube.com/watch?v=59oTw0NyTbY
https://www.youtube.com/watch?v=c7wn0I-Q0hE&list=PLWP8nuAo3nbNVl_DZiQB9HgIIYjzVo9g9&index=9
https://www.youtube.com/watch?v=YW75FWt1Z0A&list=PLWP8nuAo3nbNVl_DZiQB9HgIIYjzVo9g9&index=10
https://www.youtube.com/watch?v=G-DlyAxI_uA


On the Market:

Now there are products you can buy that will accommodate the plus sized mama.
Wrap Conversion Mie Ties are a great one. The straps are VERY long, and wide, so super comfy. They are more expensive as they are made from pricey woven wraps. You can also look for a Mei Tie with "wrap straps" and that should work.

Next you can try the infantino Sash Carrier:
http://www.amazon.com/Infantino-Sash-Carrier-Black-Gray/dp/B005C9ODQ6
There are several reviews that state it to be great for plus sized mommies. And there are a few variations of the carrier with different "prints". So long as it's the mei tie carrier this is a GREAT carrier. And you can get them used online for so cheap. An excellent alternative to a bjorn, snuggli or other crotch dangler, or expensive carrier.

Ergo Carrier:
This carrier on it's own isn't perfect for this but This company sells an extension belt that makes the waist big enough and that is what you'd need:
http://www.amazon.com/ERGO-Baby-Carrier-Waist-Extension/dp/B00273Z0AS/ref=sr_1_4?s=baby-products&ie=UTF8&qid=1379991498&sr=1-4&keywords=ergo+waist+extender

A ring sling:
Most ring slings come in sizes but you can find plenty of mom's who custom make them and can make them the lengt you need. You typically measure from your shoulder to your hip double that, then from your shoulder to where you want the tail to hit on your leg. Though each sling maker will have recomendations for measureing.
Or just buy and XL or Large sling. Make sure the product is made with Sling rings and not any other kind. Sling rings are weight tested individually up to 100 lbs and are MADE for baby wearing. Any other ring is not tested for such and has unknown weight and lead contents. It also may be welded which is a weak point in a ring and can cause breakage, or can tear fabric and cause injury to your baby.
I recommend the following sellers:
https://www.etsy.com/shop/SnuggyBaby
https://www.facebook.com/Bynanas


Lastly I'd recommended wraps. Wraps are really the MOST versatile carrier out there. And super supportive. Wraps come in many brands but some good starter LittleFrog, Wrap Nap Fairy, BB Slen, Bara Barn,and Chimparoo.
Budget is anything under 100.00 as most wraps are several hundered dollars or more. Even more so for discontinued and hard to find "prints"/colors. All wraps that aren't termed "stretchy" are woven and are great for newborn and up in age. You can wear a 4 year old or a newborn in a woven wrap.

You can even make one yourself with a little work from a tablecloth. There are many tutorials over at the babywearer forums on how to do so. ;)


Photo credit goes to my beautiful mama friends for volunteering their photo's for me to use! Thanks Tamera S., Becky W., And Sabine K.!


Wednesday, October 9, 2013

Testing a popular Pinterest tutorial: Sharpies on ceramic

I've been itching to do some crafty things lately but between potty breaks, cleaning (I'm really trying to get my house in order as it is something I struggle with), Bible study and such I haven't had much time.
I saw this popular project and wanted to try it. But I could only do so if the finished item was dishwasher safe. Which some said it was and others said it wasn't.
So I bought this little ramekin to use as a guinea pig bowl for our little girls veggies. I drew her name on one side:
And a likeness of her on the other:
 I put it in the dishwasher on a regular wash cycle and ran it overnight. Then waited till the next morning to take it out to compare. 
Then took it out. This is what her likeness looked like: 
There are a few areas where the silver sharpie wore off on her rump. And it looks like it took the brown with it on her nose.  
Her name however was perfect. Exactly how I had drawn it. So It seems to me perhaps certain colors would hold up better than others. These where standard colored sharpies and the silver metallic one. I will be interested to see how this continues to hold up in the dishwasher. I'll make sure to post after awhile to let you know how it lasts! 

Monday, July 16, 2012

Little sewing tip!


If you like me are constantly loosing your chalk and happen to always have a random nub of soap, to small to wash things with but too big to toss I have the perfect solution. Use that soap nub to mark your fabrics!
It marks darker really well and washes right out!


Friday, October 21, 2011

Nursing Shirt DIY


Hopefully it goes without saying but please do not make items from this tutorial to sell online. I don't mind if you sell them in your locall area but you must give credit to me for the idea. My blog url would be acceptable. This tutorial may not be copied or sold in any manner. all the pictures and text are copyrighted to me, Bethany Hall as of October 2011.


So since having Norrie I've been breastfeeding. the benefits are great for her and me. (lower risk of breast cancer for the win!)

The only downside? Like pregnancy clothing nursing/breastfeeding tops are super expensive! I'm sorry but 40.00 and up is ridiculous and highway robbery. So I took matters into my own hands and I want to share so we can all have inexpensive but cute nursing shirts!

Materials:
2 t-shirts. One should be the size you wear and one should be slightly bigger. I used two juniors OP "elbow sleeve" shirts from wal*mart. The bottom main shirt is a large and the one I cut up is an xl.
Wash and dry them. That finish in the shirts is awful and makes the finished product less stretchy.
  • A washable fabric marker(felt tipped works best)
  • Ruler or tape measure
  • Pins
  • Scissors
  • (not pictured) Thread in the main color on your shirt. I used white.

Measure down from the center front of your neckline about 3 inches and mark. Also mark between your breasts. I marked about an inch and a half centered between the two.
Mark about 1.5 inches from the side seam on each side. 
cut the from one of the lines between the breasts, to the line near the side seam.
You should have this. Repeat on other side.

Mark about 8.5 inches from the bottom hem of your extra shirt. I used a pin for this. You can use less but I had a striped shirt and wanted them to line up as much as possible.

 Cut up the side seams and then across the area with the pin.
This is where you should be at.
Now start pinning at the top. I line the raw long edge of the panel up with the wide stripe just below the neckline. For a non striped shirt you will start just below the neckline. Make sure to turn the raw edge under just a bit as you pin. 

Here's the shirt with the top edge pinned.
repeat on the sides.

In the case of knit shirts I'd say more pins are better. It helps prevent the fabric from slipping and stretching to much during sewing. 
Make sure you have a full or nearly full bobbin. This way it won't run out while you are sewing.

 You want ball point sewing needles. Use the orange band. Ball points won't tear the knit fabric. 
Your stitches per inch should be around 8.

Set your stitch to a nice big zig-zag.
 
Tension should be fairly tight.
Now we can start sewing! 
 Hold your top thread tight for your first few stitches. This makes sure the machine is sewing at even tension. Also don't pull your fabric as you sew. If you do this with a knit it will stretch and warp. Let the machine pull the fabric through on it's own. Just guide it with your hands.
Start sewing at the bottom of one of the sides, work up the side, across the top, then down the other side. 
 To turn a corner stop with the needle in the down position.


Lift the presser foot. The lever on the back of my machine is up to lift the presser foot.

Turn the fabric, and put the presser foot back down.
Lever down and so is the presserfoot. Sew the rest of the fabric.

Pull a few inches of thread out.

And cut in the middle.

Stitches on the shirt. :)
Remove your pins.
Now you will have two threads on the outside of the shirt. one on each side of the side seams. Thread one through a needle.

And push through to the back layer.

Remove the needle.

Some people simply cut the threads but I've had projects fall apart when this is the case. SOOO Tie them in a knot.

Then clip close to the knot. Repeat on the other side. 
Remember the holes you cut in the bottom shirt? Now we're going to finish the edges, technically you don't have to but it will prevent them from stretching out too much. Feel free to stop at this step.
Just make sure to wash your shirt before you iron it. If you iron it the marker marks won't come out. Wash it first. :)
Start sewing. Make sure to have one of the steps of the stitches go on the fabric, and one on the opening.

Hopefully you can see what I mean in these pictures.

Make sure to turn your corner and then come down the opposite side of the hole. 

Pull out a fe inches of thread and cut.

You will have two threads on the outside and two on the inside.
I couldn't get a good shot of this but tie the two on the inside in a knot and cut close to the knot, and repeat with the two on the outside.
Follow he same procedure for the opposite opening.
And you're done!


And you're done! Nursing bras are ugly maybe one day I'll tackle those...
The best part about this shirt is you can make it with long or short sleeves. And for very cheap! The two shirts I used for this tutorial cost about 5.00 each. Same for the blue one in the bottom pictures.
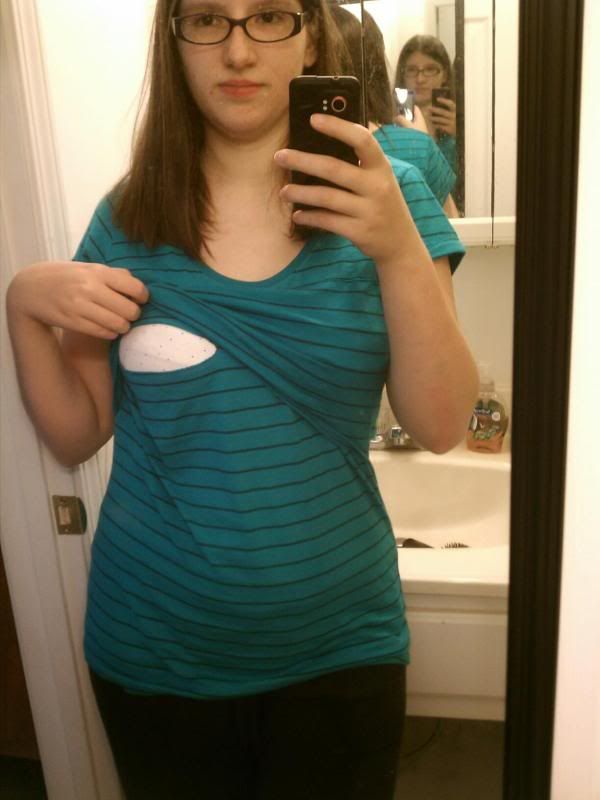
To Nurse simple unclip the nursing bra, and lift up the front flap. The openings should be right across the breast with the nipple fairly close to the middle.
Easy peasy!